Device emulator: Still work in progress

In a previous post I explained the reasons why all devices should have their code source available under a license that at least permits to modify it. For devices that are meant to be integrated with third party software, an emulator should also be available.

I see this problem all the time: VoIP vendors obviously want their phones integrated in whatever software VoIP provider are deploying, but do not provide any reasonable solution to repetitively test the integration of these devices. It starts at development time: A developer can certainly get on its desk the minimal 3 phones that are needed to test most call scenarios, but it gets quickly annoying to have to repetitively pick up and answer these phones to test the code. Even if all the annoyances that come with this did not matter (noise, cost, space on desk etc…), we live in a world were automatic regression testing is (or should) be mandatory, and there is not much of it that can be done when using a real phones. In the beginning of VoIP we only had VoIP adapters (into which you plug a Plain Old Telephone Service – POTS), and it was relatively easy to use a voice modem in place of the POTS to build an emulator, but now these kind of adapters are only used for fax machines and all the other devices are VoIP phones. To automatize the usage of these phone we need a way to press buttons, inject and extract audio and sometimes video streams without any user intervention. Some people develops hardware solutions based on various micro-controllers, Arduino and others, but the point is that providing a reliable emulator should be the responsibility of the hardware vendor.

And these days it is not as difficult as it was in the past to do so. More and more embedded designs are built around Embedded Linux which has its own emulator, QEMU. For example all the Android devices provided by Google can be emulated this way, making it easy to repetitively test an application for these devices. A few years back I used this to show a demo that involved three Android phones, all simulated in a laptop and real devices were only used to demo the quality of the audio. That made the demo easier to follow, and far easier to set up.

But the point of an emulator is that it should be running the exact same software than the real device, so the first thing that an vendor must do is to add its hardware into the QEMU emulator. And that is unfortunately a task that can be easily done only by the vendor, as a lot of the times the datasheet for the hardware is only available under NDA. For the Nephelion project – which will be distributed with emulator and source code for its device – we were not able to build an emulator using the same exact binary because of this reason. We have plans to switch to hardware that will be easier to emulate, but there is still another major issue that will prevent us to get an emulator that is 100% identical to the real hardware:

The Nephelion device is a USB gadget, but QEMU does not permit to connect the gadget inside the guest and make it visible in the host as if is was a real device. There was some experimental patches doing this a long time ago around the Openmoko project, but it seems that these patches were never integrated into QEMU.

We are using usbip, which makes our device emulator again different from the real thing as the code inside the device now has to detect that it is running on an emulator so it can start the usbip daemon and bind the dummy hcd to it. And that’s without even talking about the fact that usbip does not yet support USB 3.0.

So for now we have an emulator that is probably good enough for development and testing but there is too many differences with the real device to consider it a complete replacement that can detect the same range of problems.
Things I learned last week (8)

Android devices

Murphy’s Law adapted for Android development: The udev rules of the computer you are currently using never contain the USB ID of the Android device under test. Probably because the list of Android devices is continuously growing, it is not possible to download a set of rules that stays up to date but, as Google provides a web page containing this list of USB IDs, it is easy to write a XSLT document to process the HTML table:

<!-- generate-rules.xslt -->
<?xml version="1.0" ?>

<xsl:stylesheet version="1.0" xmlns:xsl="http://www.w3.org/1999/XSL/Transform">
  <xsl:output method="text" />
  <xsl:template match="text() | comment()" />
  <xsl:template match="table">
# Generated by generate-rules.xslt
    <xsl:apply-templates />
  </xsl:template>
  <xsl:template match="tr[1]" />
  <xsl:template match="tr">
# <xsl:value-of select="td[1]" />
SUBSYSTEM=="usb", ATTR{idVendor}=="<xsl:value-of select="td[2]" />", MODE="0666", GROUP="plugdev"
  </xsl:template>
</xsl:stylesheet>

The rules file can then be automatically generated, for example in a cron job, with a command like this:

curl https://developer.android.com/tools/device.html | xsltproc --html generate-rules.xslt - >51-android.rules

You probably need to reload udev after this.

Installing CPN Tools under Linux

I recently upgraded CPN Tools to version 3.9.3 and unfortunately this time the instructions for the installation under Linux were missing some steps:

  • Download the JRE for Windows from “https://www.java.com/en/download/manual.jsp” and install it under Wine with “wine jre-7u25-windows-i586.exe”. Install the Linux simulator.
  • After this download the new version of CPN Tools and install with “wine cpntools_3.9.3.exe”
  • Go to the simulator direction (~/.wine/drive_c/Program Files/CPN Tools/cpnsim) and make the right files executable with “chmod 775 cpnmld.x86-linux run.x86-linux”
  • In the CPN Tools directory modify the default.xml file so the “enterss.ogpath” contains “statespacefiles/”

There is 2 background jobs to start before the GUI, first is the simulator. To keep an eye on the log, I run the following script in a console:

<#!/bin/bash

trap 'kill $pid; wait; exit' INT TERM
cd ~/.wine/drive_c/Program Files/CPN Tools/cpnsim
./cpnmld.x86-linux -d 2098 ./run.x86-linux cpnmld.log &
pid=%+
tail -F cpnmld.log

The second background job is the simulator extensions server that can be started with the following command:

java -jar ~/.wine/drive_c/Program Files/CPN Tools/extensions/SimulatorExtensions.jar &

The CPN Tools GUI can finally be started with the following command:

wine ~/.wine/drive_c/Program Files/CPN Tools/cpntools.exe

One thing that does not work is the Save state space report: For some reason the open syscall receives the Windows name of the file (“C:…”) instead of the equivalent Linux name. But the state space queries are working fine, so that’s not really a big issue.

Things I learned last week (7)

Nexus 10, OTG and Pogo charger

My Mac mini was used for a long time as a MIDI controller but I needed it for something else, so I decided to use my Nexus 10 tablet instead as, with the help of an OTG cable, the tablet can power the MIDI adapter (a M-Audio Midisport 2×2). Because the MIDI adapter is drawing power from the tablet battery, I planned to use a Pogo cable to charge it at the same time. Seems easy enough, right?

Unfortunately the Nexus 10 stops charging from the Pogo cable as soon an OTG cable is connected to the USB port, but strangely the Nexus 10 still displays a charging state (I checked with an ammeter), which looks like a bug in the code. I would also classify the fact that it stops charging as a bug.

So now I’ll have to remember to unplug the OTG cable (not just the MIDI adapter) after each session so the tablet can charge, but unfortunately that’s not all. As I was doing those tests, I discover that when the OTG cable is disconnected, the Pogo charger does not go back to full charge (~1.6A) but to the nominal USB charge (i.e. 0.5A). That make a big difference in the time needed to charge the tablet. So not only I need to remember to unplug the OTG cable, but I also have to unplug and plug again the Pogo cable so the full charge mode is used. Looks like another bug in the charging logic.

Things I learned last week (2)

Debian packages without repository

There is probably a better way to do that, but here is a command that display all the installed packages that are not part of a configured repository:

apt-show-versions -a |grep "No available version in archive"

These can be packages that are installed directly using dpkg -i, but I was surprised to find that many of them were in fact packages from repositories that I removed from my configuration. The problem is that without a repository there is no way to receive the new versions, which can be a problem when a security problem is discovered. Most of these packages were not used, but it is bad idea to keep obsolete stuff around – a malicious script can still try to call code from obsolete packages in the hope that an unpatched security bug can be exploited.

Android build still requires Sun Java

For the reasons explained above, I removed the sun-java6-jdk package from my system, but that made the Android build fail, which means that Android still requires the Sun JDK 1.6 (openjdk does not work) for its build, which is kind of crazy knowing that this package is no longer maintained. Even the Android web page is wrong as Ubuntu also no longer carry this package. I first tried to rebuild the package using make-pkg, but I stopped when I saw that registration is now required to download the JDK from Oracle. Finally I found that sun-java6-jdk was still available in the oldstable Debian repository, but for how long?

Here’s the line to add to /etc/apt/sources.list:

deb http://ftp.us.debian.org/debian oldstable main contrib non-free

Asus KCMA-D8 Sensors

One of the reasons I built a new computer is because the previous one was overheating even under moderate CPU load, so I wanted to be sure that the new computer would be able to to sustain continuous load without crashing. Because my system uses a RAID array, I wanted to do the testing with Debian Live instead of the target OS. The problem was that the sensors were not displayed at all, and it took multiple hours of research (even using an I2C monitor to find out the address of the sensors chip) to finally find the reason: The PIIX4 chip has in fact 2 SMBus, but the second bus (which is the one connecting the chip managing the sensors) was not implemented in the Linux kernel version 3.2. After switching to a version 3.9 kernel the sensors were finally accessible, which showed that the north bridge was overheating. I installed a fan on top of the heatsink and now the north bridge temperature is under control and cpuburn tests shows that that new system does not overheat or crash even after one hour with the 12 cores used at 100%.

KVM and Virtualbox

Another reason for a new computer was to be able to use kvm to run the Android emulator at decent speed. But it seems that it is not possible to run a kvm application and virtualbox at the same time.
This means that I will not be able to run an Android app and its server in a virtualbox, so I’ll have to convert my servers to kvm.

Things I learned last week (1)

Android emulator

There was a lot of progress made on the Android emulator since the last time I used it for development; sensors can now be emulated, the display can use the GPU of the host and most important, the emulator can use the virtualization support of the host to run an x86 image at close to native speed. The GPU support and virtualization are now more or less mandatory because of the size of the display of modern Android devices, so it is worth the effort to configure Android for this. That requires a computer that can run KVM and to install the x86 system images.

The command line to start the emulation looks like this:

$ emulator -avd avd_name -gpu on -qemu -m 512 -enable-kvm

Unfortunately when the AVD is new, the window displayed stays black. The solution is to run it the first time with kvm disabled:

$ emulator -avd avd_name -gpu on -qemu -m 512 -disable-kvm

After this, the first command line above can be used.

CPU heatsink

My desktop computer is dying, so it is time to build a new one. I replaced the Asus K8N-DL by a KCMA-D8 motherboard and ordered the CPUs and memory to build it last week-end. Unfortunately I did not planned that the CPUs would arrive without heatsink, and unfortunately heatsinks for C32 socket are not available in stores. I suppose it makes sense that the CPUs comes without heatsink as these kind of motherboard can be used in 1U chassis, which requires a very different type of heatsink than in a tower. But now I have to wait until I receive the heatsink to finish the build.

Rescue USB flash drive

I run Debian Sid on all my non-server computers, which means that from time to time there is something to repair after an apt-get upgrade – that’s not as insane as it seems as upgrading a computer each day with the latest packages and fixing whatever broke is a great way to learn stuff. After all I am a computer professional, not a museum curator.
To repair the most broken installation I keep a Debian Live distribution on a flash drive. On the other hand my desktop computer also use a flash drive to boot GRUB (this machine uses a RAID10 array, which cannot be used for booting), so for this new build I decided to put the Debian Live distribution on the same flash drive, so I do not have to search the rescue flash drive next time I break something. It took me a while, but here the process:

Download a recent Debian Live ISO file, mount it on a loop and copy the content of the live directory on the flash drive:

# mount -o loop Downloads/debian-live-7.0.0-amd64-rescue.iso /mnt
# mkdir /boot/live
# cp /mnt/live/* /boot/live/
# umount /mnt

Then add the following in /etc/grub.d/40_custom:

menuentry "Debian rescue" {
    echo 'Loading Debian rescue ...'
    linux /live/vmlinuz boot=live live-config live-media-path=/live
    echo 'Loading initial ramdisk ...'
    initrd /live/initrd.img
}

Then update grub.cfg with the following command:

# update-grub

Note that in this configuration the flash drive is mounted on /boot.

Android in the car

I am working on an experiment on how I can reduce to the minimum the things I have to carry with me when I am out of the house. I successfully reduced the size of my wallet to 90mm x 66mm x 17mm. Keys are one area I still have to improve, but I focused mainly on the smartphone, which is the third item I have with me when traveling. My current smartphone is a Nexus One, and my first goal was to integrate it as much as possible with my car.

For a long time, I used a Motorola T505 speakerphone, which, in addition to the normal speakerphone feature, also contain an FM emitter, which gave me the possibility to use the Nexus One as an MP3 player (well, I use only OGG files – another advantage of the Android phone – so that would be an OGG player). This was working fine, and I will still keep my T505 to use in rental cars when I am traveling, but there was some limitations: I had to remember to charge the T505 from time to time (although I used it for the whole nine hours of driving between Saratoga and Las Vegas), I had to remember to connect it and disconnecting it, but the worst, especially on long travel, was the low quality and the need to periodically change the FM station.

So the goal was to have a better sound and a better integration in the car. After some research I decided to buy a Clarion BLT370. This is also a speakerphone but instead of having an integrated speaker, it has audio connectors to connect to the auxiliary input of the car’s audio system. It is also powered directly by the car battery, so there is no need to remember to charge it. Also the Bluetooth automatically disconnect when stopping the car engine and, more important, automatically tries to reconnect to the Nexus One when the engine starts, which is perfect, as I do not even have to remove the phone from my pocket to start playing music or receiving phone calls.

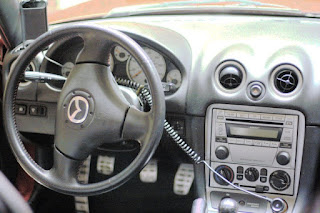
One of the potential problem was that now a cable had to go down the windshield, but fortunately I was able to hide it by running it inside the piece of plastic on the left of the windshield. Excepted that I need to be a bit more careful when opening and closing the softop, the integration as perfect as possible.

Now the next problem was that even if the Clarion had connectors to connect to the car’s audio system, the audio system in a 2004 MX5 does not have auxiliary audio input (that was before the iPod, I guess).

Luckily, other people had the same issue, and I found this terrific product, the Sylfex AuxMod. This card can be installed in the slot that is normally used for the tape player. The picture on the left shows the card installed, with the ground loop isolator required to eliminate a clicking noise. With this the sound is exceptionally good, so good that I decided to buy a 32Gb SD card for my Nexus One, rip again all my CDs in 256 Kb/s OGG files, and keep them only on my Nexus One. Now instead of playing music from my desktop computer, I play it from my Nexus One, comfortably installed in the Nexus One Desk Dock, at least until I configure a direct stream between the Nexus One and my desktop computer.

The last step was to connect the Clarion to the car battery. I did not want to do any irreversible modification in this car, so I used a Add-A-Fuse thingy, and some Velcro to keep the cables from falling on the driver’s feet.

I also installed a Nexus One Card Dock, but I do not use the integrated speakerphone, just the charging function and the ability to keep the Nexus One keep in a position easily accessible when using the GPS (the GPS turn by turn instructions are send to the audio system through Bluetooth and the Clarion transceiver).

The next step will be to find a good replacement for the cable used to charge the Nexus which, as can be seen in the picture on the left, is not really well integrated in the car. The difficulty is that although is is easy to find a cable that connect to the battery for mini-USB connector, it is not for micro-USB connectors like the one on this car dock. The only one I could find was on a web site in England.